HA即(high available)高可用,又被叫做双机热备,用于关键性业务。 工作原理:heartbeat最核心的包括两个部分,心跳监测部分和资源接管部分,心跳监测可以通过网络链路和串口进行,而且支持冗 余链路,它们之间相互发送报文来告诉对方自己当前的状态,如果在指定的时间内未收到对方发送的报文,那么就认为对方失效,这时需启动资源接管模块来接管运 行在对方主机上的资源或者服务。常见的实现高可用的开源软件有 heartbeat 和 keepalived。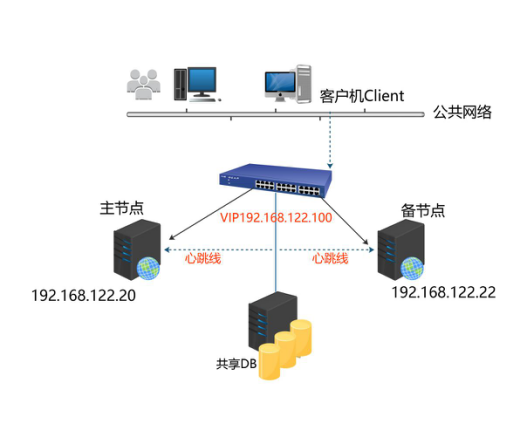
环境说明:
操作系统:CentOS release 6.8 (64)
服务器A:主机名:web1 eth0网卡地址:192.168.122.20
服务器B:主机名:web2 eth0网卡地址:192.168.122.22
虚拟VIP:192.168.122.100
前期准备:
1、修改Hostname主机名 (2台节点都需要操作)
[root@web1 ~]# vim /etc/sysconfig/network2、增加hosts (2台节点都需要操作)
[root@web1 ~]# vim /etc/hosts#增加内容如下:
192.168.122.20 web1
192.168.122.22 web2
3、关闭iptables和selinux。(2台节点都需要操作)
[root@web1 ~]# service iptables stop[root@web1 ~]# setenforce 0[root@web1 ~]# sed -i 's/SELINUX=enforcing/SELINUX=disabled/' /etc/selinux/config4、双机所需软件: libnet heartbeat nginx
#安装扩展源,或者使用阿里云扩展http://mirrors.aliyun.com/help/epel
 [root@web1 ~]# yum install epel-relese -y
[root@web1 ~]# yum install –y libnet heartbeat nginx
配置heartbeat拷贝配置文件
[root@web1 ~]# cd /usr/share/doc/heartbeat-3.0.4/
[root@web1 heartbeat-3.0.4]# cp ha.cf haresources authkeys /etc/ha.d/
[root@web1 heartbeat-3.0.4]# cd /etc/ha.d/
5、修改authkeys #取消注释,认证方式选择md5
[root@web1 ha.d]# vim authkeysauth 3
3 md5 Hello!
[root@web1 ha.d]# chmod 600 authkeys //然后修改其权限
6、编辑haresources文件
[root@web1 ha.d]# vim haresources加入下面一行:
web1 192.168.122.100/eth0 nginx
//说明:web1为主节点hostname,192.168.122.100为vip,/24为掩码为24的网段,eth0为vip的设备名,nginx为heartbeat监控的服务,也是两台机器对外提供的核心服务。
7、编辑ha.cf
[root@web1 ha.d]# vim ha.cf修改为如下内容:
debugfile /var/log/ha-debug
logfile /var/log/ha-log
logfacility local0
keepalive 2
deadtime 30
warntime 10
initdead 60
udpport 694
ucast eth0 192.168.122.22 //添加备机IP
auto_failback on
node master
node slave
ping 192.168.122.1 //网关IP
respawn hacluster /usr/lib64/heartbeat/ipfail
配置说明:
debugfile /var/log/ha-debug //该文件保存heartbeat的调试信息。
logfile /var/log/ha-log //heartbeat的日志文件。
keepalive 2 //心跳的时间间隔,默认时间单位为秒s。
deadtime 30 //超出该时间间隔未收到对方节点的心跳,则认为对方已经死亡。
warntime 10 //超出该时间间隔未收到对方节点的心跳,则发出警告并记录到日志中。
initdead 60 //系统启动或重启之后需要经过一段时间网络才能正常工作,该选项用于解决这种情况产生的时间间隔,取值至少为deadtime的2倍。
udpport 694 //设置广播通信使用的端口,694为默认使用的端口号。
ucast eth0 192.168.122.22 //设置对方机器心跳检测的网卡和IP。
auto_failback on //heartbeat的两台主机分别为主节点和从节点。主节点在正常情况下占用资源并运行所有的服务,遇到故障时把资源交给从节点由从节点运行服务。在该选项设为on的情况下,一旦主节点恢复运行,则自动获取资源并取代从节点,否则不取代从节点。
respawn heartbeat /usr/lib64/heartbeat/ipfail
指定与heartbeat一同启动和关闭的进程,该进程被自动监视,遇到故障则重新启动。最常用的进程是ipfail,该进程用于检测和处理网络故障,需要配合ping语句指定的ping node来检测网络连接。如果你的系统是64bit,请注意该文件的路径。
8、把主节点上的三个配置文件拷贝到从节点
[root@web1 ha.d]# scp authkeys ha.cf haresources web2:/etc/ha.d#如找不到scp命令,请yum 安装openssh-clients
9、从节点slave编辑ha.cf
[root@web2 ~]# vim /etc/ha.d/ha.cf只需要更改一个地方如下:
ucast eth0 192.168.122.22改为ucast eth0 192.168.122.20 //改为主机器IP
10、启动heartbeat服务
配置完毕后,先master启动,后slave启动。
[root@web1 ~]# service heartbeat startStarting High-Availability services: INFO: Resource is stopped
Done.
11、检查测试
[root@web1 ha.d]# ip a

2: eth0: <BROADCAST,MULTICAST,UP,LOWER_UP> mtu 1500 qdisc pfifo_fast state UP qlen 1000

link/ether 52:54:00:90:ee:8d brd ff:ff:ff:ff:ff:ff

inet 192.168.122.20/24 brd 192.168.122.255 scope global eth0

inet 192.168.122.120/24 brd 192.168.122.255 scope global secondary eth0

//浮动IP已漂移到主上面192.168.122.120
[root@web1 ha.d]# ps aux |grep nginx
root 15062 0.0 0.4 108936 2172 ? Ss 03:09 0:00 nginx: master process /usr/sbin/nginx -c /etc/nginx/nginx.conf
nginx 15064 0.0 0.6 109360 3204 ? S 03:09 0:00 nginx: worker process
[root@web1 ha.d]# netstat -lntp
Active Internet connections (only servers)
Proto Recv-Q Send-Q Local Address Foreign Address State PID/Program name
tcp 0 0 0.0.0.0:80 0.0.0.0:* LISTEN 17545/nginx
tcp 0 0 0.0.0.0:22 0.0.0.0:* LISTEN 2082/sshd
tcp 0 0 127.0.0.1:25 0.0.0.0:* LISTEN 1345/master
tcp 0 0 :::80 :::* LISTEN 17545/nginx
tcp 0 0 :::22 :::* LISTEN 2082/sshd
tcp 0 0 ::1:25 :::* LISTEN 1345/master
在从节点启动heartbeat
[root@web2 ~]# service heartbeat start
[root@web2 ~]# ip a
2: eth0: <BROADCAST,MULTICAST,UP,LOWER_UP> mtu 1500 qdisc pfifo_fast state UP qlen 1000
link/ether 52:54:00:e3:92:b7 brd ff:ff:ff:ff:ff:ff
inet 192.168.122.22/24 brd 192.168.122.255 scope global eth0
inet6 fe80::5054:ff:fee3:92b7/64 scope link
valid_lft forever preferred_lft forever
此时从节点没有浮动IP
12、测试方式
(1)主节点上禁ping看浮动IP是否漂移到从节点
 [root@web1 ~]# iptables -I INPUT -p icmp -j DROP
[root@web1 ~]# /etc/init.d/heartbeat stop #主节点停止heartbeat服务
[root@web2 ha.d]# tailf /var/log/ha-debug #观察从节点ha-debug日志
Jul 26 05:26:06 web3 ipfail: [6977]: debug: Got asked for num_ping.

Jul 26 05:26:06 web3 ipfail: [6977]: debug: Found ping node 192.168.122.1!

Jul 26 05:26:07 web3 ipfail: [6977]: info: Ping node count is balanced.

Jul 26 05:26:07 web3 ipfail: [6977]: debug: Abort message sent.

Jul 26 05:26:08 web3 heartbeat: [6949]: info: local resource transition completed.

Jul 26 05:26:08 web3 heartbeat: [6949]: info: Initial resource acquisition complete (T_RESOURCES(us))

Jul 26 05:26:08 web3 heartbeat: [7002]: info: No local resources [/usr/share/heartbeat/ResourceManager listkeys web3] to acquire.

Jul 26 05:26:09 web3 heartbeat: [6949]: info: remote resource transition completed.

Jul 26 05:26:09 web3 ipfail: [6977]: debug: Other side is unstable.

Jul 26 05:26:09 web3 ipfail: [6977]: debug: Other side is now stable.

Jul 26 05:46:27 web3 ipfail: [6977]: debug: Got asked for num_ping.

Jul 26 05:46:27 web3 ipfail: [6977]: debug: Found ping node 192.168.122.1!

Jul 26 05:46:28 web3 ipfail: [6977]: info: Telling other node that we have more visible ping nodes.

Jul 26 05:46:28 web3 ipfail: [6977]: debug: Sending you_are_dead.

Jul 26 05:46:28 web3 ipfail: [6977]: debug: Message [you_are_dead] sent.

Jul 26 05:46:34 web3 heartbeat: [6949]: info: web1 wants to go standby [all]

Jul 26 05:46:34 web3 ipfail: [6977]: debug: Other side is unstable.

Jul 26 05:46:35 web3 heartbeat: [6949]: info: standby: acquire [all] resources from web1

Jul 26 05:46:35 web3 heartbeat: [7117]: info: acquire all HA resources (standby).
ResourceManager(default)[7130]: 2017/07/26_05:46:35 info: Acquiring resource group: web1 192.168.122.120/24/eth0 nginx

/usr/lib/ocf/resource.d//heartbeat/IPaddr(IPaddr_192.168.122.120)[7158]: 2017/07/26_05:46:35 INFO: Resource is stopped

ResourceManager(default)[7130]: 2017/07/26_05:46:35 info: Running /etc/ha.d/resource.d/IPaddr 192.168.122.120/24/eth0 start

IPaddr(IPaddr_192.168.122.120)[7285]: 2017/07/26_05:46:35 INFO: Adding inet address 192.168.122.120/24 with broadcast address 192.168.122.255 to device eth0

IPaddr(IPaddr_192.168.122.120)[7285]: 2017/07/26_05:46:35 INFO: Bringing device eth0 up

IPaddr(IPaddr_192.168.122.120)[7285]: 2017/07/26_05:46:35 INFO: /usr/libexec/heartbeat/send_arp -i 200 -r 5 -p /var/run/resource-agents/send_arp-192.168.122.120 eth0 192.168.122.120 auto not_used not_used

/usr/lib/ocf/resource.d//heartbeat/IPaddr(IPaddr_192.168.122.120)[7259]: 2017/07/26_05:46:35 INFO: Success

INFO: Success

ResourceManager(default)[7130]: 2017/07/26_05:46:35 info: Running /etc/init.d/nginx start

Starting nginx: [ OK ]

Jul 26 05:46:35 web3 heartbeat: [7117]: info: all HA resource acquisition completed (standby).

Jul 26 05:46:35 web3 heartbeat: [6949]: info: Standby resource acquisition done [all].

Jul 26 05:46:35 web3 heartbeat: [6949]: info: remote resource transition completed.

Jul 26 05:46:35 web3 ipfail: [6977]: debug: Other side is now stable.

Jul 26 05:46:35 web3 ipfail: [6977]: debug: Other side is now stable.

ARPING 192.168.122.120 from 192.168.122.120 eth0

Sent 5 probes (5 broadcast(s))

Received 0 response(s)
查看从节点是否有浮动IP, Nginx进程是否启动成功
[root@web2 ~]# ip a2: eth0: <BROADCAST,MULTICAST,UP,LOWER_UP> mtu 1500 qdisc pfifo_fast state UP qlen 1000
link/ether 52:54:00:e3:92:b7 brd ff:ff:ff:ff:ff:ff
inet 192.168.122.22/24 brd 192.168.122.255 scope global eth0
inet 192.168.122.120/24 brd 192.168.122.255 scope global secondary eth0
[root@web3 ~]# netstat -lntp
tcp 0 0 0.0.0.0:80 0.0.0.0:* LISTEN 8050/nginx
tcp 0 0 127.0.0.1:25 0.0.0.0:* LISTEN 1685/master
[root@mysql-proxy ~]# curl 192.168.122.120 //客户端测试机器
Web3(2)测试脑裂
主节点master和从节点slave都down掉eth1网卡
[root@web1 ~]# ifdown eth1