分类目录归档:Linux运维

使用KCPTun中转加速境外服务器&多种方案


2023年4月05日 21:03:23   2,954 次浏览

前段时间研究了下多台中转服务器加速境外 SS 服务器方案,用的是 KCP 加速,当然没啥要求也可以用 iptables 端口转发,需要注意的是 kcptun 只支持单端口加速,如果需要加速多个端口,需要新建多条规则,KCP 还可以和 BBR 共同使用。

kcptun 简介

kcptun 是一个非常简单和快速的,基于 KCP 协议的 UDP 隧道,它可以将 TCP 流转换为 KCP + UDP 流。而 KCP 是一个快速可靠协议,能用比 TCP 浪费 10%-20% 的带宽的代价,换取平均延迟降低 30%-40%,延迟最大能能降低三倍。由于 kcptun 使用 Go 语言编写,内存占用低(能在 64M 内存服务器上稳定运行),而且适用于所有平台,包括 ARM 平台。

项目地址:
KCP协议
kcptun

kcptun 安装

注意服务端和客户端的版本最好一致,如果不一致可以去 kcptun 的项目地址中下载对应你系统的最新版。

服务端

  1. 这里采用一键脚本部署,SSH 连接服务器执行以下命令,CentOS 系统需要关闭防火墙或者放行相应端口
# CentOS 7+ / Debian 8+ / Ubuntu 16+
wget --no-check-certificate https://github.com/kuoruan/shell-scripts/raw/master/kcptun/kcptun.sh
chmod +x ./kcptun.sh
./kcptun.sh
  1. 上面的命令运行后,会有一系列参数设置项供选择,大部分回车选择默认即可,少部分需要自己设置,具体如下
  • 端口:默认是 29900,kcptun 客户端连接服务端使用的端口,可以保持默认,添加多条规则时需要修改
  • 加速的地址:默认为本机 127.0.0.1,加速其他服务器,需要填写其公网IP
  • 加速的端口:需要加速的端口,例如 Shadowsocks 服务端口
  • 密码:自己设置,不要使用默认密码,由于 kcptun 客户端连接
  • 加密方式选择:建议默认 aes,较强的加密方式会影响网速
  • 加速模式:默认 fast 即可,越快越浪费带宽
  • MTU:默认 1350 即可
  • sndwnd:发送窗口大小,与服务器的上传带宽大小有关,这项与 rcvwnd 的比例会影响加速效果,可以暂时设置为默认的512,不要大于你的本地宽带
  • rcvwnd:接收窗口大小,与服务器的下载带宽大小有关,可以暂设置为默认的 512 或 1024,不要大于你的本地宽带
  • 数据压缩:y,关闭数据压缩,可以一定程度上提升传输效率
  • 其他参数保持默认即可……
  1. 常用功能及命令
supervisorctl start kcptun  # 启动
supervisorctl stop kcptun  # 停止
supervisorctl restart kcptun  # 重启
supervisorctl status kcptun  # 状态
./kcptun.sh uninstall  # 卸载

客户端

这里只例举 Windows 和 Linux 客户端,其他见 kuptun 项目
kcptun:https://github.com/xtaci/kcptun/releases/

  1. Windows 客户端
    图形界面:https://github.com/dfdragon/kcptun_gclient/releases
    Windows 32位下载:windows-386,64位下载:windows-amd64
    将下载好的 kcptun 客户端解压,拖入 kcptun_gclient 目录中,点击右上角的浏览按钮,选择 client_windows_xxx.exe 的路径,最后根据服务端生成的配置信息,填写启动即可。 
  2. Linux 客户端
    根据你的系统架构下载对应的包,这里以 amd64 CentOS 7 举例,下载我打包好的 kcpclient 客户端,将目录中的 client_linux_amd64 替换为最新的版本,编辑 client-config.json 文件,修改为你的 kcptun 服务端连接信息,赋予 .sh 和 client_linux_amd64 文件执行权限,最后执行 bash start.sh 即可,如果要添加多条规则,新建多个 client-config.json 文件然后重启 kcpclient 即可 bash restart.sh

kcpclient:https://github.com/Fog-Forest/scripts/tree/main/kcptunclient

服务器架构

比较推荐使用一台中转服务器加速,直接加速效果可能不好,两台中转服务器成本太高

两台中转服务器加速

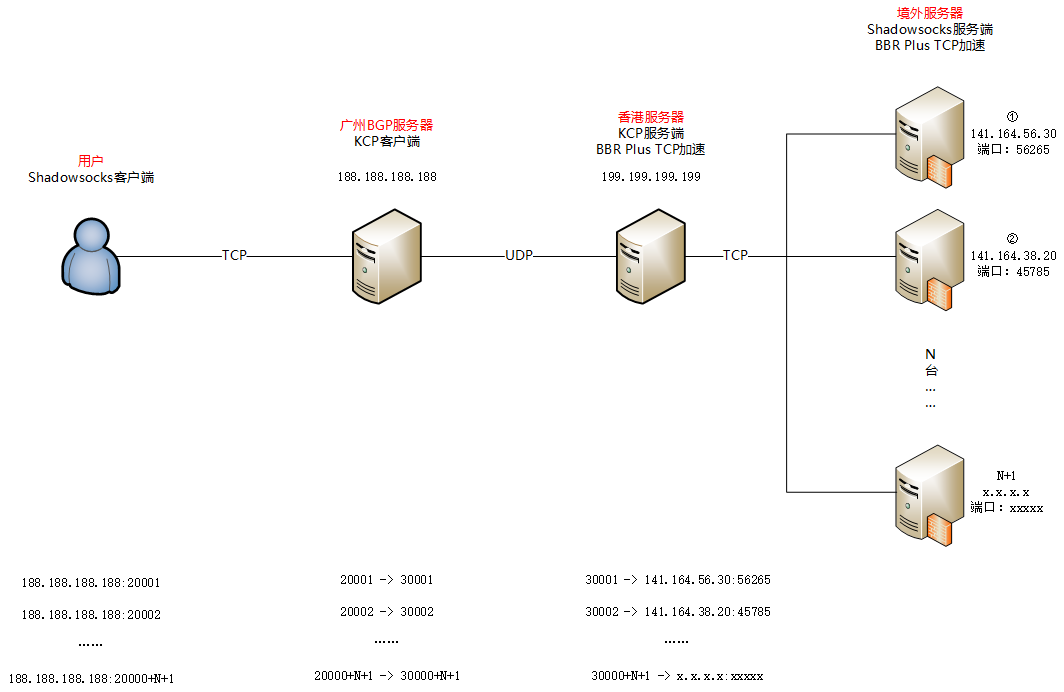
国内服务器部署 kcptun 客户端连接香港 kcptun 服务端,香港服务器部署 kcptun 服务端以及 BBR,加速境外服务器指定端口

一台中转服务器加速

有两种方案:
1. 中转服务器和境外服务器都部署 BBR,直接使用 iptables 端口转发即可
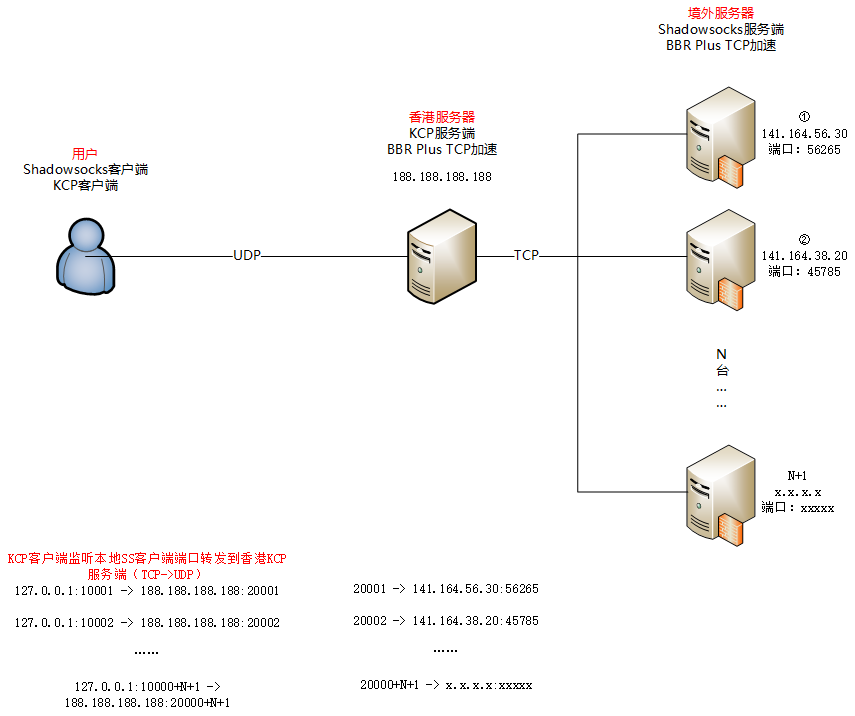
2. 境外服务器部署 BBR 和 kcptun 服务端,中转服务器部署 kcptun客户端,连接 kcptun服务端

直接加速

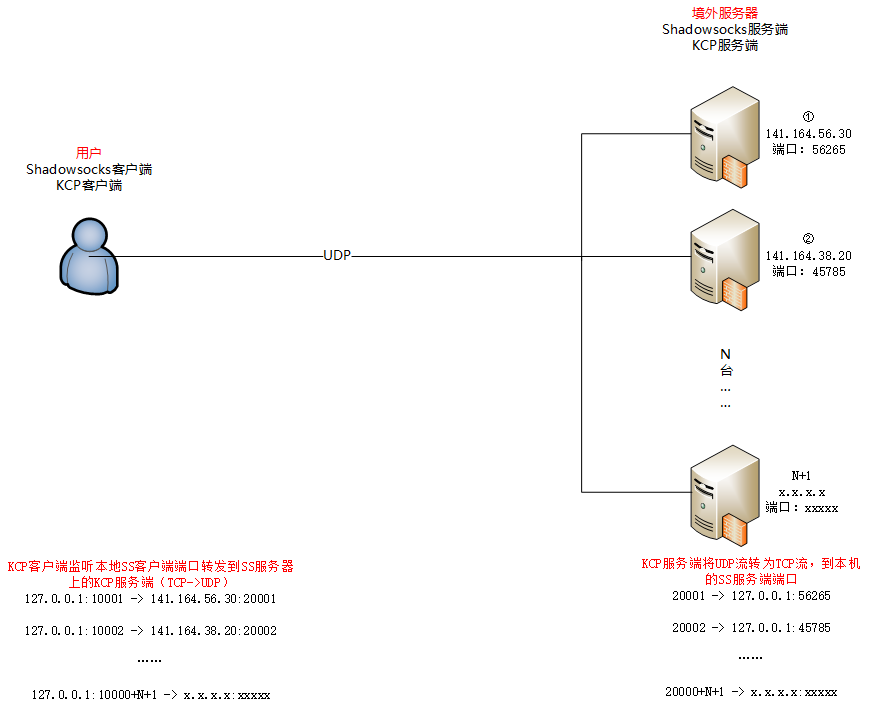
境外服务器部署 BBR 和 kcptun 服务端,用户端部署 kcptun 客户端,连接 kcptun 服务端即可

总结

使用 KCP 和端口转发的加速方案,提速效果明显,能够降低延迟,但是配置较为繁琐,如果有多台境外服务器用于 SS 的话,还可以配置负载均衡。

解决因磁盘空间耗尽导致的锁定或无法写入问题


2022年12月11日 22:42:37   1,837 次浏览

故障表现

  • 部署的应用程序突然无法将数据写入数据库,但是可以正常读取数据。
  • 通过Mongo Shell连接数据库进行排查时,测试写入一条数据,返回错误信息:not authorized on xxxx to execute command
db.customer.insert({"name":"zhangsan"})
WriteCommandError({
        "operationTime" : Timestamp(1563437183, 1),
        "ok" : 0,
        "errmsg" : "not authorized on db1 to execute command { insert: \"customer\", ordered: true, lsid: { id: UUID(\"8d43461c-5c51-49ef-b9b3-9xxxxxxxxf\") }, $clusterTime: { clusterTime: Timestamp(1563437183, 1), signature: { hash: BinData(0, 0C3FAAE747xxxxxx), keyId: 668293399xxxxxx } }, $db: \"db1\" }",
        "code" : 13,
        "codeName" : "Unauthorized",
        "$clusterTime" : {
                "clusterTime" : Timestamp(1563437183, 1),
                "signature" : {
                        "hash" : BinData(0,"DD+q50dPTuIQKTzytT5SiTPYX4Q="),
                        "keyId" : NumberLong("66xxxxxxxx")
                }
        }
})


查看磁盘空间使用率。本案例中,查看到Shard节点的磁盘空间的使用率超过了100%,由此可判断磁盘空间被耗尽

Linux下出现Read-only file system的解决办法


2022年9月09日 13:16:36   2,809 次浏览

问题描述

涉及到修改/保存条目等需要写磁盘操作的命令都无法使用(如tar、cp、mv、rm、chmod、chown、wget下载等指令),总是提示Read-only file system,也就是说系统是只读的,什么也写不了。

处理过程

1、查看/etc/fstab文件,在其中发现这样的一样记录(注意errors=remount-ro段),如下:

/dev/sda1 /ext3 errors=remount-ro 0 1

这种情况通常都是由于系统发现磁盘硬件故障或文件系统中文件被损坏之后而采取的保护机制导致的。为了保护数据不破坏分区中已有内容,Linux在挂载文件系统时就只用read-only只读方式加载了。至于挂载的文件系统为什么会莫名地变成以只读方式挂载的具体原因,这就不知道了。可能的原因有

a、系统文件损坏;

b、 磁盘有坏道;

c、fstab文件配置错误,如分区格式错误错误(将ntfs写成了fat)、配置指令拼写错误等。

如果能够确认数据和系统的文件没有被损坏,修复fstab文件配置后只要重新R/W加载或reboot就能够恢复正常。

以读写方式重新挂载文件系统

mount -o remount rw /

如果机器上有重要文件,在重新加载文件系统前可以用scp命令将其备份到远程主机上:

1 scp -r import_dir/import_file user@host:backup_dir

之所以使用scp -r命令备份重要目录/文件到远程主机上,而不用tar命令打包压缩后再传输,因为在用tar命令打包压缩文件/目录时会涉及到写磁盘操作,这会引起Read-only file system的错误。

如果是文件系统有问题,那就需要在umount状态下执行fsck命令来检查文件系统并修复文件系统中的错误。

nohup fsck -y /dev/VolGroup00/LogVol00 > /dev/shm/fscklog &

# 检查好后重启 reboot

如果是磁盘硬件损坏,最好的方法就是直接换一个新硬盘。如果你觉得旧硬盘扔了可惜,还可以将它低格之后,再重新安装系统,系统重新安装后,磁盘会重新分区。

如果仅仅是想将数据备份出来而且机器又在身边的话,你可以用live-cd从光盘启动系统,然后直接备份。当然此时你也可以修改硬盘中的配置文件,如/etc/fstab。

建议与总结

附:

另一种处理方法,方便简洁:

1、以读写方式重新挂载文件系统 mount -o remount rw /

2、在‘~’root用户的家目录下执行命令11 -a,到找.viminfo,在执行tar、cp、mv、rm、chmod、chown、wget命令,测试正常。

SLB实例压测请求504超时


2022年6月02日 15:06:49   3,465 次浏览

问题描述

对SLB实例进行压测,出现504状态码、请求超时的现象。压测的URL配置了HTTPS监听的URL转发策略,且该转发策略并没有启用健康检查。

问题原因

  1. 查看日志服务中的SLB实例日志,发现大部分请求都出现504状态码,但是upstream_response_time值都非常有规律,响应时间都是5秒,该情况是SLB与后端服务器TCP三次握手失败,导致连接超时抛出504状态码。

    说明:查看该日志需要您开通日志服务。

  2. 登录后端服务器,排查发现Nginx日志没有异常,但是messages日志存在“nf_conntrack: table full, dropping packet”错误。该信息是因为Linux系统为每个经过内核网络栈的数据包,都生成一个新的连接记录项,当服务器处理的连接过多时,连接跟踪表无法记录新的连接记录项,服务器会丢弃新建连接的数据包。所以导致SLB和后端服务器TCP三次握手失败,出现504状态码。

解决方案

  1. 建议调整nf_conntrack参数,调整命令如下所示,参数值请以实际情况为准。

    说明:该方法会临时修改参数,重启实例后配置会不生效。

    sysctl -w net.netfilter.nf_conntrack_max=1048576
    sysctl -w net.netfilter.nf_conntrack_buckets=262144
    sysctl -w net.netfilter.nf_conntrack_tcp_timeout_established=3600
  2. 确认压测正常即可。

CentOS 7 OpenVPN一键安装脚本


2022年3月03日 11:06:46   7,871 次浏览

为了避免数据库服务器等内网应用资源暴露到公网中,打算利用VPN 技术实现链接到内网。
本文主要介绍CentOS 7 服务器上安装与配置OpenVPN服务器,以及如何编写客户端连接到新建立的OpenVPN服务器上所需的配置文件

OpenVPN的介绍

OpenVPN是一个开源的应用程序,它允许您通过公共互联网创建一个安全的专用网络。OpenVPN实现一个虚拟专用网(VPN)来创建一个安全连接。OpenVPN使用OpenSSL库提供加密,它提供了几种身份验证机制,如基于证书的、预共享密钥和用户名/密码身份验证。

openvpn 有两种模式

数据包(TUN模式)或数据帧(TAP模式)

  • TUN模式:TUN模拟了网络层设备,第三层数据包如IP封包,底层数据隧道数据
  • TAP模式等同于一个设备,第二操作层数据包如扩展数据帧,创建一个相对桥接接,复杂T

接口接口的好处可见,客户端优化VPN服务子网的IP(忽然忽隐忽现)物理上的区别,可以完全将客户端看做完全与VPN服务器相关的时间,而TUN接口下所有的客户端则出现一个独立的子网内,与VPN服务器相关的子网没有关系,这种使用比较好,和公司的网络区分开,完全是一个虚拟的网络

脚本内容

openvpn 一键安装脚本

#!/bin/bash
#
# https://github.com/Nyr/openvpn-install
#
# Copyright (c) 2013 Nyr. Released under the MIT License.


# Detect Debian users running the script with "sh" instead of bash
if readlink /proc/$$/exe | grep -q "dash"; then
    echo 'This installer needs to be run with "bash", not "sh".'
    exit
fi

# Discard stdin. Needed when running from an one-liner which includes a newline
read -N 999999 -t 0.001

# Detect OpenVZ 6
if [[ $(uname -r | cut -d "." -f 1) -eq 2 ]]; then
    echo "The system is running an old kernel, which is incompatible with this installer."
    exit
fi

# Detect OS
# $os_version variables aren't always in use, but are kept here for convenience
if grep -qs "ubuntu" /etc/os-release; then
    os="ubuntu"
    os_version=$(grep 'VERSION_ID' /etc/os-release | cut -d '"' -f 2 | tr -d '.')
    group_name="nogroup"
elif [[ -e /etc/debian_version ]]; then
    os="debian"
    os_version=$(grep -oE '[0-9]+' /etc/debian_version | head -1)
    group_name="nogroup"
elif [[ -e /etc/centos-release ]]; then
    os="centos"
    os_version=$(grep -oE '[0-9]+' /etc/centos-release | head -1)
    group_name="nobody"
elif [[ -e /etc/fedora-release ]]; then
    os="fedora"
    os_version=$(grep -oE '[0-9]+' /etc/fedora-release | head -1)
    group_name="nobody"
else
    echo "This installer seems to be running on an unsupported distribution.
Supported distributions are Ubuntu, Debian, CentOS, and Fedora."
    exit
fi

if [[ "$os" == "ubuntu" && "$os_version" -lt 1804 ]]; then
    echo "Ubuntu 18.04 or higher is required to use this installer.
This version of Ubuntu is too old and unsupported."
    exit
fi

if [[ "$os" == "debian" && "$os_version" -lt 9 ]]; then
    echo "Debian 9 or higher is required to use this installer.
This version of Debian is too old and unsupported."
    exit
fi

if [[ "$os" == "centos" && "$os_version" -lt 7 ]]; then
    echo "CentOS 7 or higher is required to use this installer.
This version of CentOS is too old and unsupported."
    exit
fi

# Detect environments where $PATH does not include the sbin directories
if ! grep -q sbin <<< "$PATH"; then
    echo '$PATH does not include sbin. Try using "su -" instead of "su".'
    exit
fi

if [[ "$EUID" -ne 0 ]]; then
    echo "This installer needs to be run with superuser privileges."
    exit
fi

if [[ ! -e /dev/net/tun ]] || ! ( exec 7<>/dev/net/tun ) 2>/dev/null; then
    echo "The system does not have the TUN device available.
TUN needs to be enabled before running this installer."
    exit
fi

new_client () {
    # Generates the custom client.ovpn
    {
    cat /etc/openvpn/server/client-common.txt
    echo "<ca>"
    cat /etc/openvpn/server/easy-rsa/pki/ca.crt
    echo "</ca>"
    echo "<cert>"
    sed -ne '/BEGIN CERTIFICATE/,$ p' /etc/openvpn/server/easy-rsa/pki/issued/"$client".crt
    echo "</cert>"
    echo "<key>"
    cat /etc/openvpn/server/easy-rsa/pki/private/"$client".key
    echo "</key>"
    echo "<tls-crypt>"
    sed -ne '/BEGIN OpenVPN Static key/,$ p' /etc/openvpn/server/tc.key
    echo "</tls-crypt>"
    } > ~/"$client".ovpn
}

if [[ ! -e /etc/openvpn/server/server.conf ]]; then
    clear
    echo 'Welcome to this OpenVPN road warrior installer!'
    # If system has a single IPv4, it is selected automatically. Else, ask the user
    if [[ $(ip -4 addr | grep inet | grep -vEc '127(\.[0-9]{1,3}){3}') -eq 1 ]]; then
        ip=$(ip -4 addr | grep inet | grep -vE '127(\.[0-9]{1,3}){3}' | cut -d '/' -f 1 | grep -oE '[0-9]{1,3}(\.[0-9]{1,3}){3}')
    else
        number_of_ip=$(ip -4 addr | grep inet | grep -vEc '127(\.[0-9]{1,3}){3}')
        echo
        echo "Which IPv4 address should be used?"
        ip -4 addr | grep inet | grep -vE '127(\.[0-9]{1,3}){3}' | cut -d '/' -f 1 | grep -oE '[0-9]{1,3}(\.[0-9]{1,3}){3}' | nl -s ') '
        read -p "IPv4 address [1]: " ip_number
        until [[ -z "$ip_number" || "$ip_number" =~ ^[0-9]+$ && "$ip_number" -le "$number_of_ip" ]]; do
            echo "$ip_number: invalid selection."
            read -p "IPv4 address [1]: " ip_number
        done
        [[ -z "$ip_number" ]] && ip_number="1"
        ip=$(ip -4 addr | grep inet | grep -vE '127(\.[0-9]{1,3}){3}' | cut -d '/' -f 1 | grep -oE '[0-9]{1,3}(\.[0-9]{1,3}){3}' | sed -n "$ip_number"p)
    fi
    # If $ip is a private IP address, the server must be behind NAT
    if echo "$ip" | grep -qE '^(10\.|172\.1[6789]\.|172\.2[0-9]\.|172\.3[01]\.|192\.168)'; then
        echo
        echo "This server is behind NAT. What is the public IPv4 address or hostname?"
        # Get public IP and sanitize with grep
        get_public_ip=$(grep -m 1 -oE '^[0-9]{1,3}(\.[0-9]{1,3}){3}$' <<< "$(wget -T 10 -t 1 -4qO- "http://ip1.dynupdate.no-ip.com/" || curl -m 10 -4Ls "http://ip1.dynupdate.no-ip.com/")")
        read -p "Public IPv4 address / hostname [$get_public_ip]: " public_ip
        # If the checkip service is unavailable and user didn't provide input, ask again
        until [[ -n "$get_public_ip" || -n "$public_ip" ]]; do
            echo "Invalid input."
            read -p "Public IPv4 address / hostname: " public_ip
        done
        [[ -z "$public_ip" ]] && public_ip="$get_public_ip"
    fi
    # If system has a single IPv6, it is selected automatically
    if [[ $(ip -6 addr | grep -c 'inet6 [23]') -eq 1 ]]; then
        ip6=$(ip -6 addr | grep 'inet6 [23]' | cut -d '/' -f 1 | grep -oE '([0-9a-fA-F]{0,4}:){1,7}[0-9a-fA-F]{0,4}')
    fi
    # If system has multiple IPv6, ask the user to select one
    if [[ $(ip -6 addr | grep -c 'inet6 [23]') -gt 1 ]]; then
        number_of_ip6=$(ip -6 addr | grep -c 'inet6 [23]')
        echo
        echo "Which IPv6 address should be used?"
        ip -6 addr | grep 'inet6 [23]' | cut -d '/' -f 1 | grep -oE '([0-9a-fA-F]{0,4}:){1,7}[0-9a-fA-F]{0,4}' | nl -s ') '
        read -p "IPv6 address [1]: " ip6_number
        until [[ -z "$ip6_number" || "$ip6_number" =~ ^[0-9]+$ && "$ip6_number" -le "$number_of_ip6" ]]; do
            echo "$ip6_number: invalid selection."
            read -p "IPv6 address [1]: " ip6_number
        done
        [[ -z "$ip6_number" ]] && ip6_number="1"
        ip6=$(ip -6 addr | grep 'inet6 [23]' | cut -d '/' -f 1 | grep -oE '([0-9a-fA-F]{0,4}:){1,7}[0-9a-fA-F]{0,4}' | sed -n "$ip6_number"p)
    fi
    echo
    echo "Which protocol should OpenVPN use?"
    echo "   1) UDP (recommended)"
    echo "   2) TCP"
    read -p "Protocol [1]: " protocol
    until [[ -z "$protocol" || "$protocol" =~ ^[12]$ ]]; do
        echo "$protocol: invalid selection."
        read -p "Protocol [1]: " protocol
    done
    case "$protocol" in
        1|"") 
        protocol=udp
        ;;
        2) 
        protocol=tcp
        ;;
    esac
    echo
    echo "What port should OpenVPN listen to?"
    read -p "Port [1194]: " port
    until [[ -z "$port" || "$port" =~ ^[0-9]+$ && "$port" -le 65535 ]]; do
        echo "$port: invalid port."
        read -p "Port [1194]: " port
    done
    [[ -z "$port" ]] && port="1194"
    echo
    echo "Select a DNS server for the clients:"
    echo "   1) Current system resolvers"
    echo "   2) Google"
    echo "   3) 1.1.1.1"
    echo "   4) OpenDNS"
    echo "   5) Quad9"
    echo "   6) AdGuard"
    read -p "DNS server [1]: " dns
    until [[ -z "$dns" || "$dns" =~ ^[1-6]$ ]]; do
        echo "$dns: invalid selection."
        read -p "DNS server [1]: " dns
    done
    echo
    echo "Enter a name for the first client:"
    read -p "Name [client]: " unsanitized_client
    # Allow a limited set of characters to avoid conflicts
    client=$(sed 's/[^0123456789abcdefghijklmnopqrstuvwxyzABCDEFGHIJKLMNOPQRSTUVWXYZ_-]/_/g' <<< "$unsanitized_client")
    [[ -z "$client" ]] && client="client"
    echo
    echo "OpenVPN installation is ready to begin."
    # Install a firewall in the rare case where one is not already available
    if ! systemctl is-active --quiet firewalld.service && ! hash iptables 2>/dev/null; then
        if [[ "$os" == "centos" || "$os" == "fedora" ]]; then
            firewall="firewalld"
            # We don't want to silently enable firewalld, so we give a subtle warning
            # If the user continues, firewalld will be installed and enabled during setup
            echo "firewalld, which is required to manage routing tables, will also be installed."
        elif [[ "$os" == "debian" || "$os" == "ubuntu" ]]; then
            # iptables is way less invasive than firewalld so no warning is given
            firewall="iptables"
        fi
    fi
    read -n1 -r -p "Press any key to continue..."
    # If running inside a container, disable LimitNPROC to prevent conflicts
    if systemd-detect-virt -cq; then
        mkdir /etc/systemd/system/openvpn-server@server.service.d/ 2>/dev/null
        echo "[Service]
LimitNPROC=infinity" > /etc/systemd/system/openvpn-server@server.service.d/disable-limitnproc.conf
    fi
    if [[ "$os" = "debian" || "$os" = "ubuntu" ]]; then
        apt-get update
        apt-get install -y openvpn openssl ca-certificates $firewall
    elif [[ "$os" = "centos" ]]; then
        yum install -y epel-release
        yum install -y openvpn openssl ca-certificates tar $firewall
    else
        # Else, OS must be Fedora
        dnf install -y openvpn openssl ca-certificates tar $firewall
    fi
    # If firewalld was just installed, enable it
    if [[ "$firewall" == "firewalld" ]]; then
        systemctl enable --now firewalld.service
    fi
    # Get easy-rsa
    easy_rsa_url='https://github.com/OpenVPN/easy-rsa/releases/download/v3.0.8/EasyRSA-3.0.8.tgz'
    mkdir -p /etc/openvpn/server/easy-rsa/
    { wget -qO- "$easy_rsa_url" 2>/dev/null || curl -sL "$easy_rsa_url" ; } | tar xz -C /etc/openvpn/server/easy-rsa/ --strip-components 1
    chown -R root:root /etc/openvpn/server/easy-rsa/
    cd /etc/openvpn/server/easy-rsa/
    # Create the PKI, set up the CA and the server and client certificates
    ./easyrsa init-pki
    ./easyrsa --batch build-ca nopass
    EASYRSA_CERT_EXPIRE=3650 ./easyrsa build-server-full server nopass
    EASYRSA_CERT_EXPIRE=3650 ./easyrsa build-client-full "$client" nopass
    EASYRSA_CRL_DAYS=3650 ./easyrsa gen-crl
    # Move the stuff we need
    cp pki/ca.crt pki/private/ca.key pki/issued/server.crt pki/private/server.key pki/crl.pem /etc/openvpn/server
    # CRL is read with each client connection, while OpenVPN is dropped to nobody
    chown nobody:"$group_name" /etc/openvpn/server/crl.pem
    # Without +x in the directory, OpenVPN can't run a stat() on the CRL file
    chmod o+x /etc/openvpn/server/
    # Generate key for tls-crypt
    openvpn --genkey --secret /etc/openvpn/server/tc.key
    # Create the DH parameters file using the predefined ffdhe2048 group
    echo '-----BEGIN DH PARAMETERS-----
MIIBCAKCAQEA//////////+t+FRYortKmq/cViAnPTzx2LnFg84tNpWp4TZBFGQz
+8yTnc4kmz75fS/jY2MMddj2gbICrsRhetPfHtXV/WVhJDP1H18GbtCFY2VVPe0a
87VXE15/V8k1mE8McODmi3fipona8+/och3xWKE2rec1MKzKT0g6eXq8CrGCsyT7
YdEIqUuyyOP7uWrat2DX9GgdT0Kj3jlN9K5W7edjcrsZCwenyO4KbXCeAvzhzffi
7MA0BM0oNC9hkXL+nOmFg/+OTxIy7vKBg8P+OxtMb61zO7X8vC7CIAXFjvGDfRaD
ssbzSibBsu/6iGtCOGEoXJf//////////wIBAg==
-----END DH PARAMETERS-----' > /etc/openvpn/server/dh.pem
    # Generate server.conf
    echo "local $ip
port $port
proto $protocol
dev tun
ca ca.crt
cert server.crt
key server.key
dh dh.pem
auth SHA512
tls-crypt tc.key
topology subnet
server 10.8.0.0 255.255.255.0" > /etc/openvpn/server/server.conf
    # IPv6
    if [[ -z "$ip6" ]]; then
        echo 'push "redirect-gateway def1 bypass-dhcp"' >> /etc/openvpn/server/server.conf
    else
        echo 'server-ipv6 fddd:1194:1194:1194::/64' >> /etc/openvpn/server/server.conf
        echo 'push "redirect-gateway def1 ipv6 bypass-dhcp"' >> /etc/openvpn/server/server.conf
    fi
    echo 'ifconfig-pool-persist ipp.txt' >> /etc/openvpn/server/server.conf
    # DNS
    case "$dns" in
        1|"")
            # Locate the proper resolv.conf
            # Needed for systems running systemd-resolved
            if grep -q '^nameserver 127.0.0.53' "/etc/resolv.conf"; then
                resolv_conf="/run/systemd/resolve/resolv.conf"
            else
                resolv_conf="/etc/resolv.conf"
            fi
            # Obtain the resolvers from resolv.conf and use them for OpenVPN
            grep -v '^#\|^;' "$resolv_conf" | grep '^nameserver' | grep -oE '[0-9]{1,3}(\.[0-9]{1,3}){3}' | while read line; do
                echo "push \"dhcp-option DNS $line\"" >> /etc/openvpn/server/server.conf
            done
        ;;
        2)
            echo 'push "dhcp-option DNS 8.8.8.8"' >> /etc/openvpn/server/server.conf
            echo 'push "dhcp-option DNS 8.8.4.4"' >> /etc/openvpn/server/server.conf
        ;;
        3)
            echo 'push "dhcp-option DNS 1.1.1.1"' >> /etc/openvpn/server/server.conf
            echo 'push "dhcp-option DNS 1.0.0.1"' >> /etc/openvpn/server/server.conf
        ;;
        4)
            echo 'push "dhcp-option DNS 208.67.222.222"' >> /etc/openvpn/server/server.conf
            echo 'push "dhcp-option DNS 208.67.220.220"' >> /etc/openvpn/server/server.conf
        ;;
        5)
            echo 'push "dhcp-option DNS 9.9.9.9"' >> /etc/openvpn/server/server.conf
            echo 'push "dhcp-option DNS 149.112.112.112"' >> /etc/openvpn/server/server.conf
        ;;
        6)
            echo 'push "dhcp-option DNS 94.140.14.14"' >> /etc/openvpn/server/server.conf
            echo 'push "dhcp-option DNS 94.140.15.15"' >> /etc/openvpn/server/server.conf
        ;;
    esac
    echo "keepalive 10 120
cipher AES-256-CBC
user nobody
group $group_name
persist-key
persist-tun
verb 3
crl-verify crl.pem" >> /etc/openvpn/server/server.conf
    if [[ "$protocol" = "udp" ]]; then
        echo "explicit-exit-notify" >> /etc/openvpn/server/server.conf
    fi
    # Enable net.ipv4.ip_forward for the system
    echo 'net.ipv4.ip_forward=1' > /etc/sysctl.d/99-openvpn-forward.conf
    # Enable without waiting for a reboot or service restart
    echo 1 > /proc/sys/net/ipv4/ip_forward
    if [[ -n "$ip6" ]]; then
        # Enable net.ipv6.conf.all.forwarding for the system
        echo "net.ipv6.conf.all.forwarding=1" >> /etc/sysctl.d/99-openvpn-forward.conf
        # Enable without waiting for a reboot or service restart
        echo 1 > /proc/sys/net/ipv6/conf/all/forwarding
    fi
    if systemctl is-active --quiet firewalld.service; then
        # Using both permanent and not permanent rules to avoid a firewalld
        # reload.
        # We don't use --add-service=openvpn because that would only work with
        # the default port and protocol.
        firewall-cmd --add-port="$port"/"$protocol"
        firewall-cmd --zone=trusted --add-source=10.8.0.0/24
        firewall-cmd --permanent --add-port="$port"/"$protocol"
        firewall-cmd --permanent --zone=trusted --add-source=10.8.0.0/24
        # Set NAT for the VPN subnet
        firewall-cmd --direct --add-rule ipv4 nat POSTROUTING 0 -s 10.8.0.0/24 ! -d 10.8.0.0/24 -j SNAT --to "$ip"
        firewall-cmd --permanent --direct --add-rule ipv4 nat POSTROUTING 0 -s 10.8.0.0/24 ! -d 10.8.0.0/24 -j SNAT --to "$ip"
        if [[ -n "$ip6" ]]; then
            firewall-cmd --zone=trusted --add-source=fddd:1194:1194:1194::/64
            firewall-cmd --permanent --zone=trusted --add-source=fddd:1194:1194:1194::/64
            firewall-cmd --direct --add-rule ipv6 nat POSTROUTING 0 -s fddd:1194:1194:1194::/64 ! -d fddd:1194:1194:1194::/64 -j SNAT --to "$ip6"
            firewall-cmd --permanent --direct --add-rule ipv6 nat POSTROUTING 0 -s fddd:1194:1194:1194::/64 ! -d fddd:1194:1194:1194::/64 -j SNAT --to "$ip6"
        fi
    else
        # Create a service to set up persistent iptables rules
        iptables_path=$(command -v iptables)
        ip6tables_path=$(command -v ip6tables)
        # nf_tables is not available as standard in OVZ kernels. So use iptables-legacy
        # if we are in OVZ, with a nf_tables backend and iptables-legacy is available.
        if [[ $(systemd-detect-virt) == "openvz" ]] && readlink -f "$(command -v iptables)" | grep -q "nft" && hash iptables-legacy 2>/dev/null; then
            iptables_path=$(command -v iptables-legacy)
            ip6tables_path=$(command -v ip6tables-legacy)
        fi
        echo "[Unit]
Before=network.target
[Service]
Type=oneshot
ExecStart=$iptables_path -t nat -A POSTROUTING -s 10.8.0.0/24 ! -d 10.8.0.0/24 -j SNAT --to $ip
ExecStart=$iptables_path -I INPUT -p $protocol --dport $port -j ACCEPT
ExecStart=$iptables_path -I FORWARD -s 10.8.0.0/24 -j ACCEPT
ExecStart=$iptables_path -I FORWARD -m state --state RELATED,ESTABLISHED -j ACCEPT
ExecStop=$iptables_path -t nat -D POSTROUTING -s 10.8.0.0/24 ! -d 10.8.0.0/24 -j SNAT --to $ip
ExecStop=$iptables_path -D INPUT -p $protocol --dport $port -j ACCEPT
ExecStop=$iptables_path -D FORWARD -s 10.8.0.0/24 -j ACCEPT
ExecStop=$iptables_path -D FORWARD -m state --state RELATED,ESTABLISHED -j ACCEPT" > /etc/systemd/system/openvpn-iptables.service
        if [[ -n "$ip6" ]]; then
            echo "ExecStart=$ip6tables_path -t nat -A POSTROUTING -s fddd:1194:1194:1194::/64 ! -d fddd:1194:1194:1194::/64 -j SNAT --to $ip6
ExecStart=$ip6tables_path -I FORWARD -s fddd:1194:1194:1194::/64 -j ACCEPT
ExecStart=$ip6tables_path -I FORWARD -m state --state RELATED,ESTABLISHED -j ACCEPT
ExecStop=$ip6tables_path -t nat -D POSTROUTING -s fddd:1194:1194:1194::/64 ! -d fddd:1194:1194:1194::/64 -j SNAT --to $ip6
ExecStop=$ip6tables_path -D FORWARD -s fddd:1194:1194:1194::/64 -j ACCEPT
ExecStop=$ip6tables_path -D FORWARD -m state --state RELATED,ESTABLISHED -j ACCEPT" >> /etc/systemd/system/openvpn-iptables.service
        fi
        echo "RemainAfterExit=yes
[Install]
WantedBy=multi-user.target" >> /etc/systemd/system/openvpn-iptables.service
        systemctl enable --now openvpn-iptables.service
    fi
    # If SELinux is enabled and a custom port was selected, we need this
    if sestatus 2>/dev/null | grep "Current mode" | grep -q "enforcing" && [[ "$port" != 1194 ]]; then
        # Install semanage if not already present
        if ! hash semanage 2>/dev/null; then
            if [[ "$os_version" -eq 7 ]]; then
                # Centos 7
                yum install -y policycoreutils-python
            else
                # CentOS 8 or Fedora
                dnf install -y policycoreutils-python-utils
            fi
        fi
        semanage port -a -t openvpn_port_t -p "$protocol" "$port"
    fi
    # If the server is behind NAT, use the correct IP address
    [[ -n "$public_ip" ]] && ip="$public_ip"
    # client-common.txt is created so we have a template to add further users later
    echo "client
dev tun
proto $protocol
remote $ip $port
resolv-retry infinite
nobind
persist-key
persist-tun
remote-cert-tls server
auth SHA512
cipher AES-256-CBC
ignore-unknown-option block-outside-dns
block-outside-dns
verb 3" > /etc/openvpn/server/client-common.txt
    # Enable and start the OpenVPN service
    systemctl enable --now openvpn-server@server.service
    # Generates the custom client.ovpn
    new_client
    echo
    echo "Finished!"
    echo
    echo "The client configuration is available in:" ~/"$client.ovpn"
    echo "New clients can be added by running this script again."
else
    clear
    echo "OpenVPN is already installed."
    echo
    echo "Select an option:"
    echo "   1) Add a new client"
    echo "   2) Revoke an existing client"
    echo "   3) Remove OpenVPN"
    echo "   4) Exit"
    read -p "Option: " option
    until [[ "$option" =~ ^[1-4]$ ]]; do
        echo "$option: invalid selection."
        read -p "Option: " option
    done
    case "$option" in
        1)
            echo
            echo "Provide a name for the client:"
            read -p "Name: " unsanitized_client
            client=$(sed 's/[^0123456789abcdefghijklmnopqrstuvwxyzABCDEFGHIJKLMNOPQRSTUVWXYZ_-]/_/g' <<< "$unsanitized_client")
            while [[ -z "$client" || -e /etc/openvpn/server/easy-rsa/pki/issued/"$client".crt ]]; do
                echo "$client: invalid name."
                read -p "Name: " unsanitized_client
                client=$(sed 's/[^0123456789abcdefghijklmnopqrstuvwxyzABCDEFGHIJKLMNOPQRSTUVWXYZ_-]/_/g' <<< "$unsanitized_client")
            done
            cd /etc/openvpn/server/easy-rsa/
            EASYRSA_CERT_EXPIRE=3650 ./easyrsa build-client-full "$client" nopass
            # Generates the custom client.ovpn
            new_client
            echo
            echo "$client added. Configuration available in:" ~/"$client.ovpn"
            exit
        ;;
        2)
            # This option could be documented a bit better and maybe even be simplified
            # ...but what can I say, I want some sleep too
            number_of_clients=$(tail -n +2 /etc/openvpn/server/easy-rsa/pki/index.txt | grep -c "^V")
            if [[ "$number_of_clients" = 0 ]]; then
                echo
                echo "There are no existing clients!"
                exit
            fi
            echo
            echo "Select the client to revoke:"
            tail -n +2 /etc/openvpn/server/easy-rsa/pki/index.txt | grep "^V" | cut -d '=' -f 2 | nl -s ') '
            read -p "Client: " client_number
            until [[ "$client_number" =~ ^[0-9]+$ && "$client_number" -le "$number_of_clients" ]]; do
                echo "$client_number: invalid selection."
                read -p "Client: " client_number
            done
            client=$(tail -n +2 /etc/openvpn/server/easy-rsa/pki/index.txt | grep "^V" | cut -d '=' -f 2 | sed -n "$client_number"p)
            echo
            read -p "Confirm $client revocation? [y/N]: " revoke
            until [[ "$revoke" =~ ^[yYnN]*$ ]]; do
                echo "$revoke: invalid selection."
                read -p "Confirm $client revocation? [y/N]: " revoke
            done
            if [[ "$revoke" =~ ^[yY]$ ]]; then
                cd /etc/openvpn/server/easy-rsa/
                ./easyrsa --batch revoke "$client"
                EASYRSA_CRL_DAYS=3650 ./easyrsa gen-crl
                rm -f /etc/openvpn/server/crl.pem
                cp /etc/openvpn/server/easy-rsa/pki/crl.pem /etc/openvpn/server/crl.pem
                # CRL is read with each client connection, when OpenVPN is dropped to nobody
                chown nobody:"$group_name" /etc/openvpn/server/crl.pem
                echo
                echo "$client revoked!"
            else
                echo
                echo "$client revocation aborted!"
            fi
            exit
        ;;
        3)
            echo
            read -p "Confirm OpenVPN removal? [y/N]: " remove
            until [[ "$remove" =~ ^[yYnN]*$ ]]; do
                echo "$remove: invalid selection."
                read -p "Confirm OpenVPN removal? [y/N]: " remove
            done
            if [[ "$remove" =~ ^[yY]$ ]]; then
                port=$(grep '^port ' /etc/openvpn/server/server.conf | cut -d " " -f 2)
                protocol=$(grep '^proto ' /etc/openvpn/server/server.conf | cut -d " " -f 2)
                if systemctl is-active --quiet firewalld.service; then
                    ip=$(firewall-cmd --direct --get-rules ipv4 nat POSTROUTING | grep '\-s 10.8.0.0/24 '"'"'!'"'"' -d 10.8.0.0/24' | grep -oE '[^ ]+$')
                    # Using both permanent and not permanent rules to avoid a firewalld reload.
                    firewall-cmd --remove-port="$port"/"$protocol"
                    firewall-cmd --zone=trusted --remove-source=10.8.0.0/24
                    firewall-cmd --permanent --remove-port="$port"/"$protocol"
                    firewall-cmd --permanent --zone=trusted --remove-source=10.8.0.0/24
                    firewall-cmd --direct --remove-rule ipv4 nat POSTROUTING 0 -s 10.8.0.0/24 ! -d 10.8.0.0/24 -j SNAT --to "$ip"
                    firewall-cmd --permanent --direct --remove-rule ipv4 nat POSTROUTING 0 -s 10.8.0.0/24 ! -d 10.8.0.0/24 -j SNAT --to "$ip"
                    if grep -qs "server-ipv6" /etc/openvpn/server/server.conf; then
                        ip6=$(firewall-cmd --direct --get-rules ipv6 nat POSTROUTING | grep '\-s fddd:1194:1194:1194::/64 '"'"'!'"'"' -d fddd:1194:1194:1194::/64' | grep -oE '[^ ]+$')
                        firewall-cmd --zone=trusted --remove-source=fddd:1194:1194:1194::/64
                        firewall-cmd --permanent --zone=trusted --remove-source=fddd:1194:1194:1194::/64
                        firewall-cmd --direct --remove-rule ipv6 nat POSTROUTING 0 -s fddd:1194:1194:1194::/64 ! -d fddd:1194:1194:1194::/64 -j SNAT --to "$ip6"
                        firewall-cmd --permanent --direct --remove-rule ipv6 nat POSTROUTING 0 -s fddd:1194:1194:1194::/64 ! -d fddd:1194:1194:1194::/64 -j SNAT --to "$ip6"
                    fi
                else
                    systemctl disable --now openvpn-iptables.service
                    rm -f /etc/systemd/system/openvpn-iptables.service
                fi
                if sestatus 2>/dev/null | grep "Current mode" | grep -q "enforcing" && [[ "$port" != 1194 ]]; then
                    semanage port -d -t openvpn_port_t -p "$protocol" "$port"
                fi
                systemctl disable --now openvpn-server@server.service
                rm -rf /etc/openvpn/server
                rm -f /etc/systemd/system/openvpn-server@server.service.d/disable-limitnproc.conf
                rm -f /etc/sysctl.d/99-openvpn-forward.conf
                if [[ "$os" = "debian" || "$os" = "ubuntu" ]]; then
                    apt-get remove --purge -y openvpn
                else
                    # Else, OS must be CentOS or Fedora
                    yum remove -y openvpn
                fi
                echo
                echo "OpenVPN removed!"
            else
                echo
                echo "OpenVPN removal aborted!"
            fi
            exit
        ;;
        4)
            exit
        ;;
    esac
fi


MySql Lock wait timeout exceeded该如何处理?


2020年8月28日 17:22:02   1,885 次浏览

这个问题我相信大家对它并不陌生,但是有很多人对它产生的原因以及处理吃的不是特别透,很多情况都是交给DBA去定位和处理问题,接下来我们就针对这个问题来展开讨论。

Mysql造成锁的情况有很多,下面我们就列举一些情况:

  1. 执行DML操作没有commit,再执行删除操作就会锁表。
  2. 在同一事务内先后对同一条数据进行插入和更新操作。
  3. 表索引设计不当,导致数据库出现死锁。
  4. 长事物,阻塞DDL,继而阻塞所有同表的后续操作。

但是要区分的是Lock wait timeout exceededDead Lock是不一样。

  • Lock wait timeout exceeded:后提交的事务等待前面处理的事务释放锁,但是在等待的时候超过了mysql的锁等待时间,就会引发这个异常。
  • Dead Lock:两个事务互相等待对方释放相同资源的锁,从而造成的死循环,就会引发这个异常。

还有一个要注意的是innodb_lock_wait_timeoutlock_wait_timeout也是不一样的。

  • innodb_lock_wait_timeout:innodb的dml操作的行级锁的等待时间
  • lock_wait_timeout:数据结构ddl操作的锁的等待时间

如何查看innodb_lock_wait_timeout的具体值?

SHOW VARIABLES LIKE 'innodb_lock_wait_timeout'

如何修改innode lock wait timeout的值?

参数修改的范围有Session和Global,并且支持动态修改,可以有两种方法修改:

方法一:

通过下面语句修改

set innodb_lock_wait_timeout=100;
set global innodb_lock_wait_timeout=100;

ps. 注意global的修改对当前线程是不生效的,只有建立新的连接才生效。

方法二:

修改参数文件/etc/my.cnf innodb_lock_wait_timeout = 50

ps. innodb_lock_wait_timeout指的是事务等待获取资源等待的最长时间,超过这个时间还未分配到资源则会返回应用失败; 当锁等待超过设置时间的时候,就会报如下的错误;ERROR 1205 (HY000): Lock wait timeout exceeded; try restarting transaction。其参数的时间单位是秒,最小可设置为1s(一般不会设置得这么小),最大可设置1073741824秒,默认安装时这个值是50s(默认参数设置)。

下面介绍在遇到这类问题该如何处理

问题现象

  • 数据更新或新增后数据经常自动回滚。
  • 表操作总报 Lock wait timeout exceeded 并长时间无反应

解决方法

  • 应急方法:show full processlist; kill掉出现问题的进程。 ps.有的时候通过processlist是看不出哪里有锁等待的,当两个事务都在commit阶段是无法体现在processlist上
  • 根治方法:select * from innodb_trx;查看有是哪些事务占据了表资源。 ps.通过这个办法就需要对innodb有一些了解才好处理

说起来很简单找到它杀掉它就搞定了,但是实际上并没有想象的这么简单,当问题出现要分析问题的原因,通过原因定位业务代码可能某些地方实现的有问题,从而来避免今后遇到同样的问题。

innodb_*表的解释

MysqlInnoDB存储引擎是支持事务的,事务开启后没有被主动Commit。导致该资源被长期占用,其他事务在抢占该资源时,因上一个事务的锁而导致抢占失败!因此出现 Lock wait timeout exceeded

下面几张表是innodb的事务和锁的信息表,理解这些表就能很好的定位问题。

innodb_trx ## 当前运行的所有事务 innodb_locks ## 当前出现的锁 innodb_lock_waits ## 锁等待的对应关系

下面对 innodb_trx 表的每个字段进行解释:

trx_id:事务ID。
trx_state:事务状态,有以下几种状态:RUNNING、LOCK WAITROLLING BACK 和 COMMITTING。
trx_started:事务开始时间。
trx_requested_lock_id:事务当前正在等待锁的标识,可以和 INNODB_LOCKS 表 JOIN 以得到更多详细信息。
trx_wait_started:事务开始等待的时间。
trx_weight:事务的权重。
trx_mysql_thread_id:事务线程 ID,可以和 PROCESSLISTJOIN。
trx_query:事务正在执行的 SQL 语句。
trx_operation_state:事务当前操作状态。
trx_tables_in_use:当前事务执行的 SQL 中使用的表的个数。
trx_tables_locked:当前执行 SQL 的行锁数量。
trx_lock_structs:事务保留的锁数量。
trx_lock_memory_bytes:事务锁住的内存大小,单位为 BYTES。
trx_rows_locked:事务锁住的记录数。包含标记为 DELETED,并且已经保存到磁盘但对事务不可见的行。
trx_rows_modified:事务更改的行数。
trx_concurrency_tickets:事务并发票数。
trx_isolation_level:当前事务的隔离级别。
trx_unique_checks:是否打开唯一性检查的标识。
trx_foreign_key_checks:是否打开外键检查的标识。
trx_last_foreign_key_error:最后一次的外键错误信息。
trx_adaptive_hash_latched:自适应散列索引是否被当前事务锁住的标识。
trx_adaptive_hash_timeout:是否立刻放弃为自适应散列索引搜索 LATCH 的标识。

下面对 innodb_locks 表的每个字段进行解释:

lock_id:锁 ID。
lock_trx_id:拥有锁的事务 ID。可以和 INNODB_TRX 表 JOIN 得到事务的详细信息。
lock_mode:锁的模式。有如下锁类型:行级锁包括:S、X、IS、IX,分别代表:共享锁、排它锁、意向共享锁、意向排它锁。表级锁包括:S_GAP、X_GAP、IS_GAP、IX_GAP 和 AUTO_INC,分别代表共享间隙锁、排它间隙锁、意向共享间隙锁、意向排它间隙锁和自动递增锁。
lock_type:锁的类型。RECORD 代表行级锁,TABLE 代表表级锁。
lock_table:被锁定的或者包含锁定记录的表的名称。
lock_index:当 LOCK_TYPE=’RECORD’ 时,表示索引的名称;否则为 NULL。
lock_space:当 LOCK_TYPE=’RECORD’ 时,表示锁定行的表空间 ID;否则为 NULL。
lock_page:当 LOCK_TYPE=’RECORD’ 时,表示锁定行的页号;否则为 NULL。
lock_rec:当 LOCK_TYPE=’RECORD’ 时,表示一堆页面中锁定行的数量,亦即被锁定的记录号;否则为 NULL。
lock_data:当 LOCK_TYPE=’RECORD’ 时,表示锁定行的主键;否则为NULL

下面对 innodb_lock_waits 表的每个字段进行解释:

requesting_trx_id:请求事务的 ID。
requested_lock_id:事务所等待的锁定的 ID。可以和 INNODB_LOCKS 表 JOIN。
blocking_trx_id:阻塞事务的 ID。
blocking_lock_id:某一事务的锁的 ID,该事务阻塞了另一事务的运行。可以和 INNODB_LOCKS 表 JOIN。

锁等待的处理步骤

  • 直接查看 innodb_lock_waits 表
SELECT * FROM innodb_lock_waits;
  • innodb_locks 表和 innodb_lock_waits 表结合:
SELECT * FROM innodb_locks WHERE lock_trx_id IN (SELECT blocking_trx_id FROM innodb_lock_waits);
  • innodb_locks 表 JOIN innodb_lock_waits 表:
SELECT innodb_locks.* FROM innodb_locks JOIN innodb_lock_waits ON (innodb_locks.lock_trx_id = innodb_lock_waits.blocking_trx_id);
  • 查询 innodb_trx 表:
SELECT trx_id, trx_requested_lock_id, trx_mysql_thread_id, trx_query FROM innodb_trx WHERE trx_state = 'LOCK WAIT';
  • trx_mysql_thread_id 即kill掉事务线程 ID
SHOW ENGINE INNODB STATUS ;
SHOW PROCESSLIST ;

从上述方法中得到了相关信息,我们可以得到发生锁等待的线程 ID,然后将其 KILL 掉。 KILL 掉发生锁等待的线程。

kill ID;

阿里云线上java应用cpu100%问题处理


2019年3月26日 18:43:00   1,623 次浏览

最近这两天一直收到监控告警提示,告警周期都很短也就持续几分钟所以就忽略了。后面再次出现告警的时候总觉得不正常,于是开始排查原因。

从监控中可以看出cpu使用率一直在居高不下的状态,最高使用率达到93%。

简单分析下可能出问题的地方,分为5个方向:

  1. 系统本身代码问题
  2. 内部下游系统的问题导致的雪崩效应
  3. 上游系统调用量突增
  4. http请求第三方的问题
  5. 机器本身的问题


查看日志,没有发现什么明显的错误日志,初步排除代码逻辑处理错误。只发现有个job在处理zip压缩包?接下来继续分析

2019-03-26 18:06:22 |-INFO  [pool-554-thread-8] in  c.f.trip.abc.runable.ElongPriceRefresh - updateEnd!
2019-03-26 18:06:25 |-INFO  [pool-554-thread-4] in  c.f.trip.abc.runable.ElongPriceRefresh - updateEnd!
2019-03-26 18:06:26 |-INFO  [pool-554-thread-3] in  c.f.trip.abc.runable.ElongPriceRefresh - updateEnd!
2019-03-26 18:06:26 |-INFO  [scheduler_Worker-5] in  com.xxx.trip.abc.job.ElongRateUpdateJob - 总线程数:12;
2019-03-26 18:06:41 |-INFO  [scheduler_Worker-5] in  com.xxx.trip.abc.job.ElongRateUpdateJob - 总线程数:12;
2019-03-26 18:06:48 |-INFO  [pool-554-thread-7] in  c.f.trip.abc.runable.ElongPriceRefresh - updateEnd!
2019-03-26 18:06:56 |-INFO  [scheduler_Worker-5] in  com.xxx.trip.abc.job.ElongRateUpdateJob - 总线程数:11;
2019-03-26 18:07:00 |-INFO  [scheduler_Worker-1] in  com.xxx.trip.abc.job.AuditCancelJob - audit cancel job start...
2019-03-26 18:07:00 |-INFO  [scheduler_Worker-7] in  c.f.trip.abc.job.AirPortTransferSmsJob - start AirPortTransferSmsJob ...
2019-03-26 18:07:00 |-INFO  [scheduler_Worker-7] in  c.f.trip.abc.job.AirPortTransferSmsJob - end AirPortTransferSmsJob ...
2019-03-26 18:07:00 |-INFO  [scheduler_Worker-3] in  c.f.t.s.train.abc.impl.TrainOrderServiceImpl - tip orders is empty
2019-03-26 18:07:03 |-INFO  [scheduler_Worker-1] in  com.xxx.trip.abc.job.AuditCancelJob - audit cancel job end!
2019-03-26 18:07:11 |-INFO  [scheduler_Worker-5] in  com.xxx.trip.abc.job.ElongRateUpdateJob - 总线程数:11;
2019-03-26 18:07:20 |-INFO  [pool-554-thread-9] in  c.f.trip.abc.runable.ElongPriceRefresh - updateEnd!
2019-03-26 18:07:26 |-INFO  [scheduler_Worker-5] in  com.xxx.trip.abc.job.ElongRateUpdateJob - 总线程数:10;
2019-03-26 18:07:28 |-INFO  [scheduler_Worker-9] in  com.xxx.trip.abc.job.QiantaoMinpriceJob - try again count :2,url = http://www.xxxx.com:7001/CF100296__hotelPrice_-1183552046.zip

上top工具,好家伙进程PID28204 cpu飙到168,下一步就是定位java线程拿出jstatck来分析。

查看线程top -Hp 28204 ,这里一共跑了600个线程,找到下面几个最高的线程,28210,28775,29475,29473,29468

将线程id转换为16进制 printf “%x\n”  线程ID

使用jstatck查看线程堆栈信息

jstack命令打印线程堆栈信息,命令格式:jstack pid |grep  -A 10 tid

难道是这个线程影响cpu上升的吗? 赶紧联系开发人员一起查看。

开发说这个流式读取写入缓冲区,文件大小500M,左右,读取会比较慢,40分钟左右读完。每次任务跑完一次至少一个半小时

既然开发这样说了我表示怀疑的态度去看了一下配置文件,这分明是10分钟跑一次啊。让开发给个合适的值,修改后重启服务

cpu现在使用时60%,在观察几天看看。

Dstat-监控Linux下系统资源性能统计工具


2019年3月25日 13:20:02   2,480 次浏览
什么是Dstat ?

stat是一个功能强大,灵活多变的工具,类似于 vmstat、iostat、mpstat,所不同的是,可以监控多个系统指标,如 CPU、网络、内存、中断等,可以将结果显示到终端,也可保存到文件。另外,该程序是通过 Python 实现的。

Dstat用法:

dstat [-afv] [options..] [delay [count]]

常用选项:
-c, –cpu
统计CPU状态,包括 user, system, idle (空闲等待时间百分比), wait (等待磁盘IO),
hardware interrupt (硬件中断), software interrupt (软件中断) 等;
-d, –disk
统计磁盘读写状态,主要包括了读写信息;
-l, –load
统计系统负载情况,包括1分钟、5分钟、15分钟平均值;
-m, –mem
统计系统物理内存使用情况,包括used, buffers, cache, free;
-s, –swap
统计swap已使用和剩余量;
-n, –net
统计网络使用情况,包括接收和发送数据;
-p, –proc
统计进程信息,包括runnable、uninterruptible、new;
-N eth1,total
统计eth1接口汇总流量;
-r, –io
统计I/O请求,包括读写请求;
-y, –sys
统计系统信息,包括中断、上下文切换;
-t
显示统计时时间,对分析历史数据非常有用;
–fs
统计文件打开数和inodes数;

如何安装

在CentOS和Redhat中

yum install dstat -y

dstat不支持python3,如果你的系统中使用了python3需要修改dstat文件头部改为python2

< 11 NGINX-1 - [root]: ~ > # which dstat
/usr/bin/dstat

< 11 NGINX-1 - [root]: ~ > # vim /usr/bin/dstat
#!/usr/bin/python2.7
### This program is free software; you can redistribute it and/or modify
### it under the terms of the GNU Library General Public License as published by
### the Free Software Foundation; version 2 only
###
### This program is distributed in the hope that it will be useful,
### but WITHOUT ANY WARRANTY; without even the implied warranty of
### MERCHANTABILITY or FITNESS FOR A PARTICULAR PURPOSE. See the
### GNU Library General Public License for more details.
###
### You should have received a copy of the GNU Library General Public License
### along with this program; if not, write to the Free Software
### Foundation, Inc., 59 Temple Place - Suite 330, Boston, MA 02111-1307, USA.
### Copyright 2004-2007 Dag Wieers <dag@wieers.com>


from __future__ import generators


try:
    import sys, os, time, sched, re, getopt
    import types, resource, getpass, glob, linecache
    except KeyboardInterrupt:
pass


VERSION = '0.7.2'
theme = { 'default': '' }
if sys.version_info < (2, 2):
    sys.exit('error: Python 2.2 or later required')

### Workaround for python <= 2.2.1

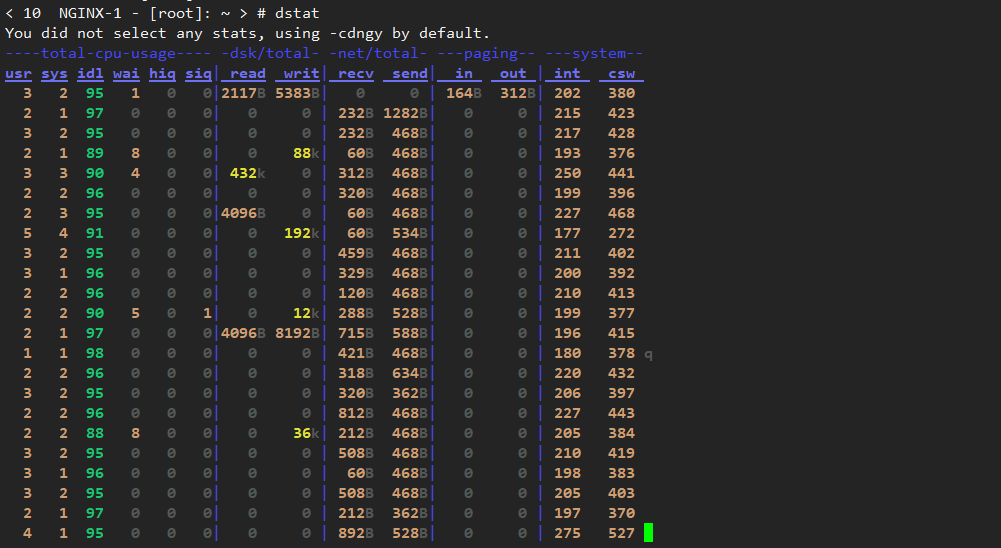
dsata如果不加选项默认选项是-a或cdngy选项

上面的输出结果:

  1. CPU统计数据:用户(usr)进程的CPU使用情况,系统(sys)进程,以及空闲(idl)和等待(wai)进程数,硬中断(hiq)和软中断(siq)。
  2. 磁盘统计信息:磁盘上的读取(读取)和写入(写入)操作的总数。
  3. 网络统计:网络接口上接收(recv)和发送(发送)的总字节数。
  4. 分页统计信息:信息被复制到内存中(内)和外出(外出)的次数。
  5. 系统统计信息:中断数(int)和上下文切换(csw)。

要显示提供的信息vmstat,请使用-v--vmstat选项:

  1. 进程统计:运行(run),阻塞(blk)和新(new)生成进程的数量。
  2. 内存统计:使用(used),缓冲(buff),缓存(cach)和剩余(free)内存的数量。
Dstat进阶操作
  1. -c – CPU使用率
  2. --top-cpu – 使用大多数CPU的过程
  3. -dn – 磁盘和网络统计信息
  4. --top-mem – 消耗最多内存的进程
dstat -c --top-cpu -dn --top-mem

我们可以通过启用--output选项,将dstat的输出存储在文件中,以便在以后进行分析。

示例:显示时间,CPU,内存,系统负载统计数据,每隔1秒刷新一次,捕捉5次结果后退出dstat。

dstat --time --cpu --mem --load --output report.csv 1 5

显示每个CPU的详细信息(包括cpu0,cpu1等)和总使用情况。它显示每个CPU(用户时间,系统时间,空闲时间,和等待时间)活动进程

dstat -C 0,1,2,total

显示有关特定磁盘的磁盘利用率(读取和写入)和磁盘I / O(读取和写入)利用率的详细信息。如果要检查总磁盘利用率和I / O,请使用dstat --disk --io

显示特定网络利用率(数据接收和数据发送)的详细信息。如果要显示所有以太网利用率,请使用dstat --net

dstat --net -N eno16777728

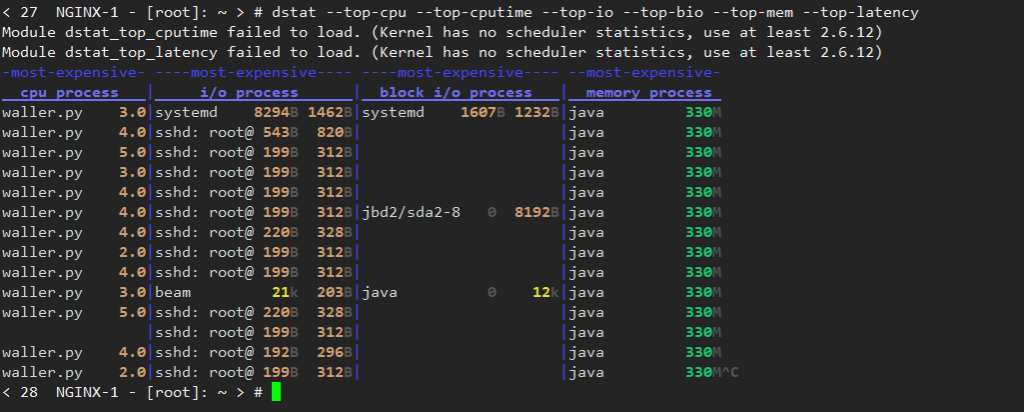
显示有关top cpu,top cputime(使用最多CPU时间(以ms为单位)的进程),top磁盘I / O活动,top磁盘块I / O活动,top memory和top latency usage的详细信息。

dstat --top-cpu --top-cputime --top-io --top-bio --top-mem --top-latency

显示有关(CPU,磁盘,内存,进程,负载和网络)使用情况的详细信息,这对于服务器负载过高时的基本故障排除非常常见。

dstat --cpu --mem --proc --load --disk --net

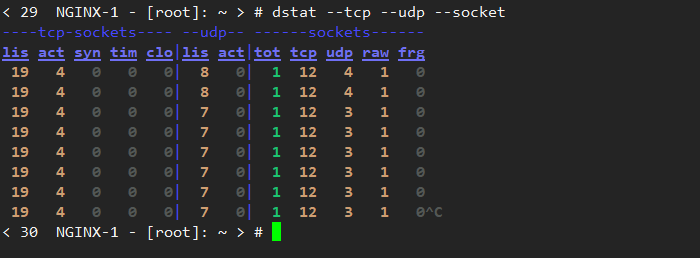
显示网络有关tcp(listen,established,syn,time_wait,close),udp(listen,active)和socket(total,tcp,udp,raw,ip-fragments)用法的详细信息。

dstat --tcp --udp --socket

nginx反向代理后响应200但是没有返回数据


2019年3月13日 15:09:00   5,263 次浏览

最近公司在上线新的项目,原来的环境都是每个项目配置一个独立的域名。因微信回调域名添加有限制貌似最多只能添加5个,新项目又急着上线,注册新的微信公众号资料繁琐且时间紧张,只能改造公司内部的项目了,一台服务器要配置一个独立域名通过多个目录形式访问不同的多个前端项目,这时候nginx开始上场了 。单个项目还好说,如下修改nginx的nginx.conf配置文件

前端打包react的文件后的dist目录,然后使用nginx反向代理

网上大多数的文章都是这样配置的,单个项目

try_files $uri $uri/ /index.html;

多个项目配置

try_files $uri $uri/ /Aproject/index.html;
try_files $uri $uri/ /Bproject/index.html;

然而这样配置后页面都是200状态接口依旧还是没有返回数据

// 访问这里的接口是正常的,后台接口是用node.js写的,返回的是json格式

location /style {
 proxy_pass   http://localhost:80808;      
 proxy_set_header  Host       $host;
 proxy_set_header  X-Real-IP  $remote_addr;
 proxy_set_header  X-Forwarded-For  $proxy_add_x_forwarded_for;

}
  1. // 访问这里的接口会返回200,但是没有响应体
  2. // 去掉下面的rewrite会显示404
location /api {
 rewrite  ^/api/?(.*)$ /$1 break;
 add_header backendIP $upstream_addr;
 add_header backendCode $upstream_status;
 proxy_pass http://xxxx;

}

修改node项目的路由代码将browserHistory改成history模式

删除process.env.API_ENV == ‘dev’ ? “/” :

package.json文件增加homepage

修改静态资源调用代码

最后nginx配置如下

server
{
   listen 1080;
   server_name 192.168.1.36;
       root   /data/apps-data/h5/;
       index index.php index.html index.htm default.html default.htm default.php;
       error_page      404  /errors/404.htm;
       error_page      403  /errors/403.html;
       location /flight {
               alias   /data/apps-data/h5/flight/;
               try_files $uri $uri/ /flight/index.html;
               proxy_set_header   Host             $host;
               proxy_set_header   X-Real-IP        $remote_addr;
               proxy_set_header   X-Forwarded-For  $proxy_add_x_forwarded_for;
               proxy_set_header   X-Forwarded-Proto  $scheme;
                 }
               location /flight/flightList/static/ {
               alias   /data/apps-data/h5/flight/static/;
               }
       location /hotel {
               alias   /data/apps-data/h5/hotel/;
               try_files $uri $uri/ /hotel/index.html;
               proxy_set_header   Host             $host;
               proxy_set_header   X-Real-IP        $remote_addr;
               proxy_set_header   X-Forwarded-For  $proxy_add_x_forwarded_for;
               proxy_set_header   X-Forwarded-Proto  $scheme;
               proxy_set_header Upgrade $http_upgrade;
               proxy_set_header Connection $connection_upgrade;
   }
       location /auth {
               alias   /data/apps-data/h5/auth/;
               try_files $uri $uri/ /auth/index.html;
               proxy_set_header   Host             $host;
               proxy_set_header   X-Real-IP        $remote_addr;
               proxy_set_header   X-Forwarded-For  $proxy_add_x_forwarded_for;
               proxy_set_header   X-Forwarded-Proto  $scheme;
       }
       }

最后配置二层代理线上代理线下的nginx服务

server
{
   listen 80;
   server_name hello.com;
   location / {
       proxy_redirect ~^http://work.baidu.com:1018/(.*) http://hello.com/$1;
       proxy_connect_timeout 600;
       proxy_read_timeout 600;
       proxy_send_timeout 600;
       proxy_buffer_size       64k;
       proxy_buffers           4 64k;
       proxy_busy_buffers_size 128k;
       proxy_temp_file_write_size 128k;
       proxy_set_header Host $host;
       proxy_set_header X-Real-IP $remote_addr;
       proxy_set_header X-Forwarded-For $proxy_add_x_forwarded_for;
       proxy_pass http://work.baidu.com:1018/;
       expires -1;
       }
   access_log logs/hotel.log;
   error_log  logs/hotel-error.log;
}


Linux性能监测:IO篇


2019年2月28日 17:26:00   1,441 次浏览

说到IO性能,就不得不说我曾经干过的一件傻事,这件事情让我记忆犹新。那还是我在xxx干活的时候,有一次需要进行全量上线,说到上线,那肯定就要对当前应用进行备份了。这个备份的活我都干了好久了,每次都是那么几个命令,先tar,然后再gzip,每次都是一个接一个的备份,而备份一个又要好久;然后我就想偷懒,耍个小聪明,写了一个脚本,一次同时并行备份所有的文件,然后启动脚本就OK了,也不需要人值守。我就这么干了,没过多久,前台使用人员就反馈系统反应慢,我一听,慌了,立马看了下,备份脚本占用了大量的IO,导致IO急剧飙升,导致系统整体性能下降。我都佩服我这个小机灵鬼,立马发现了问题,解决了问题。如何发现问题,请各位继续往下看。

说到IO,就得先说说存储系统。我们知道,在存储系统里面,越靠近CPU的(比如CPU的缓存),价格越贵、容量越小、速度越快;越远离CPU的(比如磁盘),价格越便宜、容量越大、速度越慢。而磁盘通常是计算机最慢的子系统,也是最容易出现性能瓶颈的地方,因为磁盘离CPU距离最远而且CPU访问磁盘要涉及到机械操作,比如转轴、寻轨等。访问硬盘和访问内存之间的速度差别是以数量级来计算的,就像1天和1分钟的差别一样。要监测IO性能,就有必要了解一下基本原理和Linux是如何处理硬盘和内存之间的IO的。

先说理论

而要说IO性能,就不得不先说说缺页中断了。Linux利用虚拟内存极大的扩展了程序地址空间,使得原来物理内存不能容下的程序也可以通过内存和硬盘之间的不断交换(把暂时不用的内存页交换到硬盘,把需要的内存页从硬盘读到内存)来赢得更多的内存,看起来就像物理内存被扩大了一样。事实上这个过程对程序是完全透明的,程序完全不用理会自己哪一部分、什么时候被交换进内存,一切都有内核的虚拟内存管理来完成。当程序启动的时候,Linux内核首先检查CPU的缓存和物理内存,如果数据已经在内存里就忽略,如果数据不在内存里就引起一个缺页中断(Page Fault),然后从硬盘读取缺页,并把缺页缓存到物理内存里。缺页中断可分为主缺页中断(Major Page Fault)和次缺页中断(Minor Page Fault),要从磁盘读取数据而产生的中断是主缺页中断;数据已经被读入内存并被缓存起来,从内存缓存区中而不是直接从硬盘中读取数据而产生的中断是次缺页中断。

上面的内存缓存区起到了预读硬盘的作用,内核先在物理内存里寻找缺页,没有的话产生次缺页中断从内存缓存里找,如果还没有发现的话就从硬盘读取。很显然,把多余的内存拿出来做成内存缓存区提高了访问速度,这里还有一个命中率的问题,运气好的话如果每次缺页都能从内存缓存区读取的话将会极大提高性能。要提高命中率的一个简单方法就是增大内存缓存区面积,缓存区越大预存的页面就越多,命中率也会越高。

内存缓存区(也叫文件缓存区File Buffer Cache)读取页比从硬盘读取页要快得多,所以Linux内核希望能尽可能产生次缺页中断(从文件缓存区读),并且能尽可能避免主缺页中断(从硬盘读),这样随着次缺页中断的增多,文件缓存区也逐步增大,直到系统只有少量可用物理内存的时候Linux才开始释放一些不用的页。我们运行Linux一段时间后会发现虽然系统上运行的程序不多,但是可用内存总是很少,这样给大家造成了Linux对内存管理很低效的假象,事实上Linux把那些暂时不用的物理内存高效的利用起来做预存(内存缓存区)了。

比如,以下这样的一个输出:

[root@Test_Server ~]# cat /proc/meminfo

MemTotal:        1883496 kB
MemFree:          137236 kB
MemAvailable:     286512 kB
Buffers:          107028 kB
Cached:           150352 kB

可以看到内存一共大概2G(MemTotal),其中大概130M可用(MemFree),100多M用来做磁盘缓存(Buffers),150多M用来做文件缓存(Cached)。

好了,有了这些基本知识,我们再来看IO性能的分析。

再说实干

说到实际的,那就要说说实际运维工作中,我们如何发现IO性能瓶颈。

我们进行IO分析,第一步还是需要祭出我们的神器vmstat,关于vmstat如何使用可以参见这篇《Linux vmstat命令详解》,通过vmstat的输出,重点关注bbibowa字段。这几个值变大,都意味着IO的消耗增加。对于读请求大的服务器,一般bbiwa都会比较大,而对于写入量大的服务器,一般bbowa都会比较大。

接下来就是使用第二个神器iostat。通过这个神器,我们就可以监视具体的磁盘性能了。对于iostat这个命令的具体教程,可以参见这篇《Linux iostat命令详解》。

但是,在实际运维工作中,我们都希望找到是哪个进程消耗了IO,所以我们的终极目的是找到这个进程ID。可是通过vmstatiostat都没法达到我们的目的。所以,神器pidstat命令就登场了,通过这个命令,我们就可以知道是谁在后台偷用IO了。我想我整理的这篇《Linux pidstat命令详解》对你应该有一些帮助。

现在定位到进程级别了,很多时候,我们需要知道这个进程到底打开了哪些文件,这个进程到底和哪些进程关联,这个时候就不得不提到lsof命令了。